How to Make Elderberry Juice | Simple Recipe
It’s very easy to make your own elderberry juice to drink on its own or to make it into a syrup for all its immune-boosting, health-promoting properties.
If you love elderberries as much as I do, you’re going to love this easy-to-make elderberry juice!
When I was a kid, I remember gathering elderberries with my grandparents in the fall.
These tiny, blackberries are known for their health-promoting and immune-boosting properties.
Let me show you how easy it is to make your own elderberry juice at home! It is so much cheaper than the store-bought version!
Why Elderberries?
Elderberries are native shrubs that grow in North America and Europe. People have traditionally been using both the flowers and the berries in many recipes. Elderflowers and berries are valued during the flu season as they boost the immune system. With their high Vitamin C content and high levels of antioxidants, they are traditionally used to treat colds, flu, constipation, hay fever, and sinus infections.
Aside from the health benefits of elderberries, I just love their taste. It’s very fruity but has a distinctive tartness to it. I suspect that I also love the taste because it brings back childhood memories.
This post contains affiliate links, which means I make a small commission at no extra cost to you. You can read my full disclosure.
How to find Elderberries
Here are some ways to source elderberries:
- I love wild elderberries! The elder tree (Sambucus nigra) is the easiest to spot during the spring when it is covered in clusters of white flowers. Mark their location so that you can easily find them during the fall.
- Plant an elderberry bush in your own garden! You can simply take a piece of stem in stick it in the ground in the late fall. It might take a few years before it starts bearing enough fruit that you can actually make enough juice. You can also check with your local nursery or an online nursery such as this one or on amazon.
- If you can’t find fresh elderberries, you can always use dried elderberries (more on that below).
Ingredients:
For this simple recipe you really only need
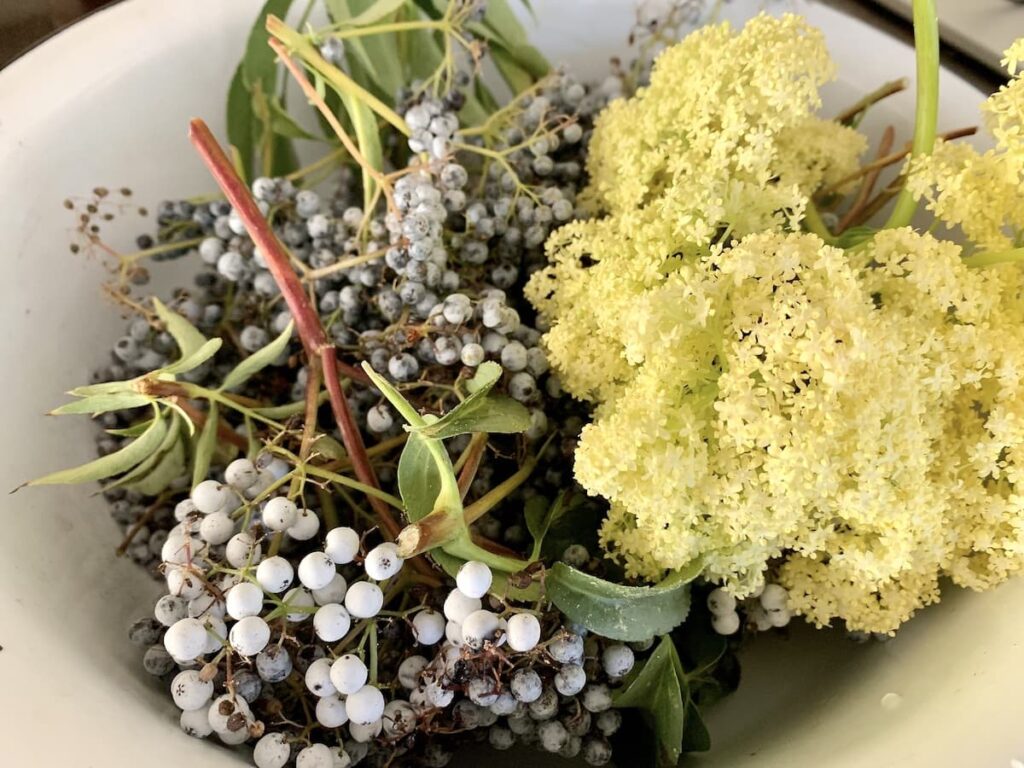
- Elderberries: be sure to use only ripe elderberries
- Water: for boiling
- Optional ingredients: see below
Helpful tools and Equipment
These are my recommendations:
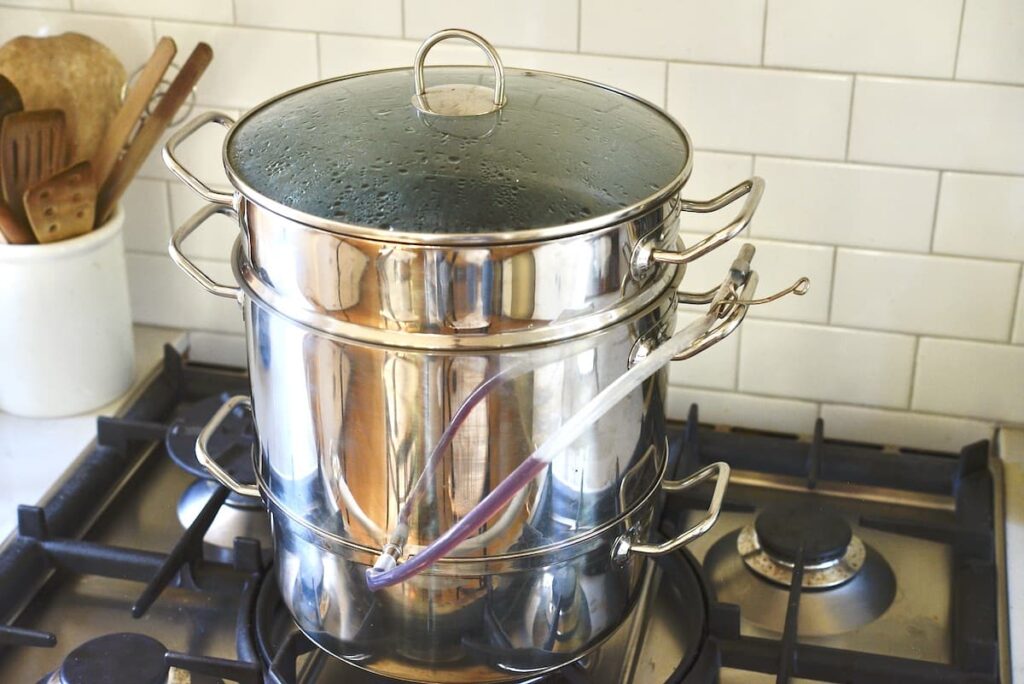
- First choice: A steam juicer! I recommend you get one if you are often juicing elderberries or juicing large quantities. Of course, you can use it for other fruits as well such as quince.
- Second choice: A large pot, preferably stainless steel. You probably already have that in your kitchen
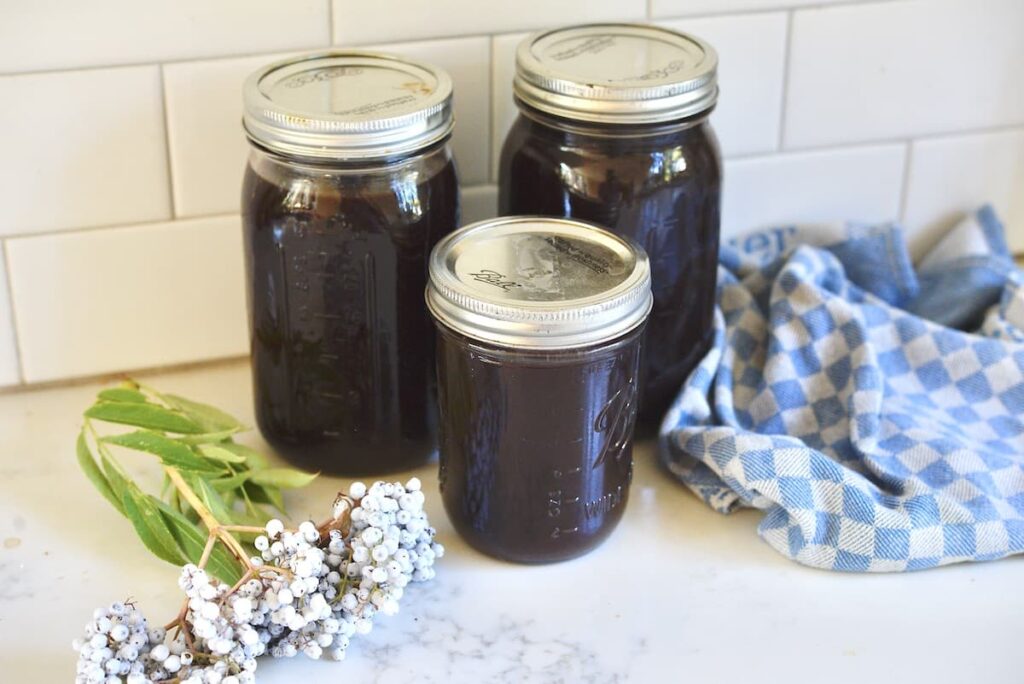
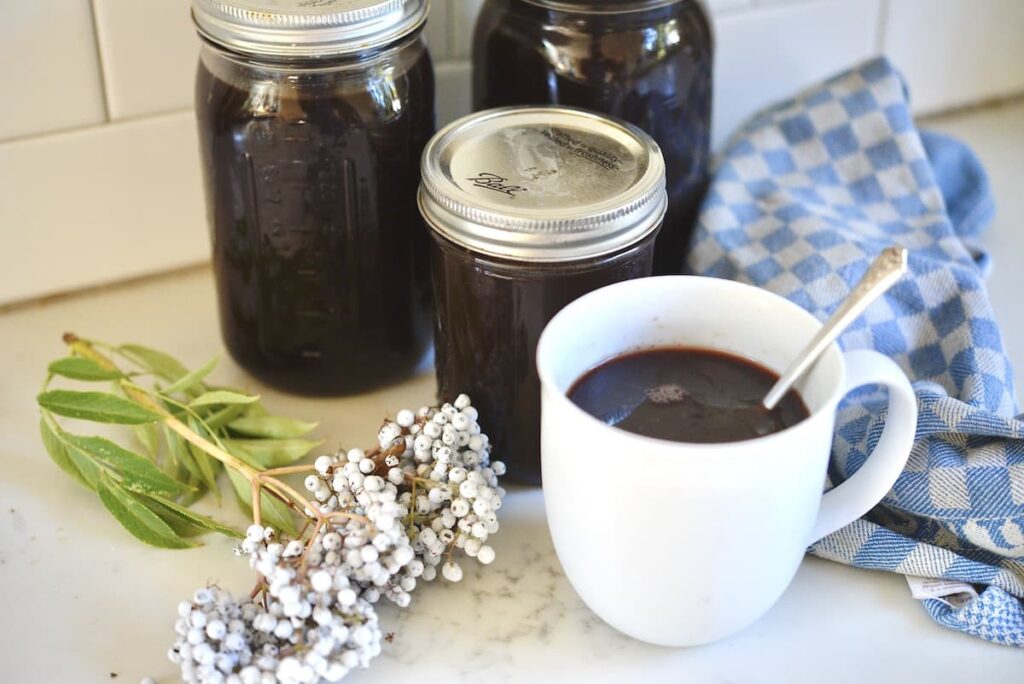
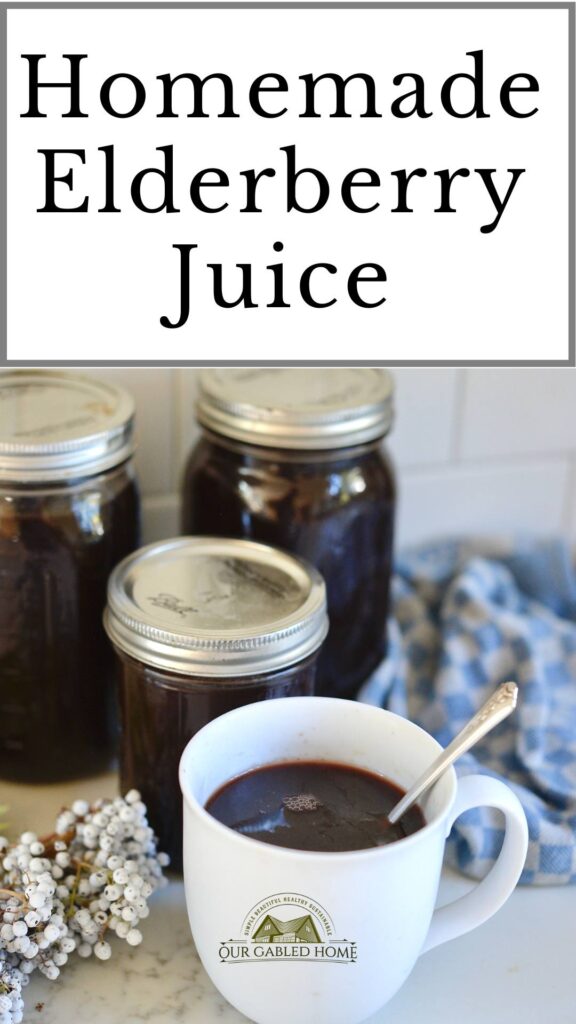
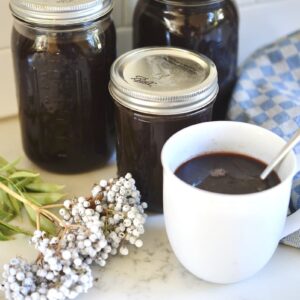
- Mason jars or bottles: Unless you are consuming the elderberry juice right away, canning the juice is the best way to extend its shelf life
- Fine sieve: If you are juicing the fresh berries in a pot, you will need to strain the juice. Alternatively, you can use a cheesecloth.
How to Extract the Elderberry Juice
Method 1 – The Steam Juicer
- Fill the bottom of the steam juicer with at least 10 cups of water. Place the top part back on the juicer and bring the water to a boil over high heat.
- Fill the top portion of the juicer with your elderberries. I recommend picking out any green berries. I typically throw the elderberry clusters in there with the little stems but cut off the bigger stems and leaves. NOTE: Raw elderberries as well as the leaves and stems are mildly toxic (they contain cyanogenic glycosides).
- Once the water is boiling turn it to simmer. The steam will extract the juice from the berries and will pool in the middle portion.
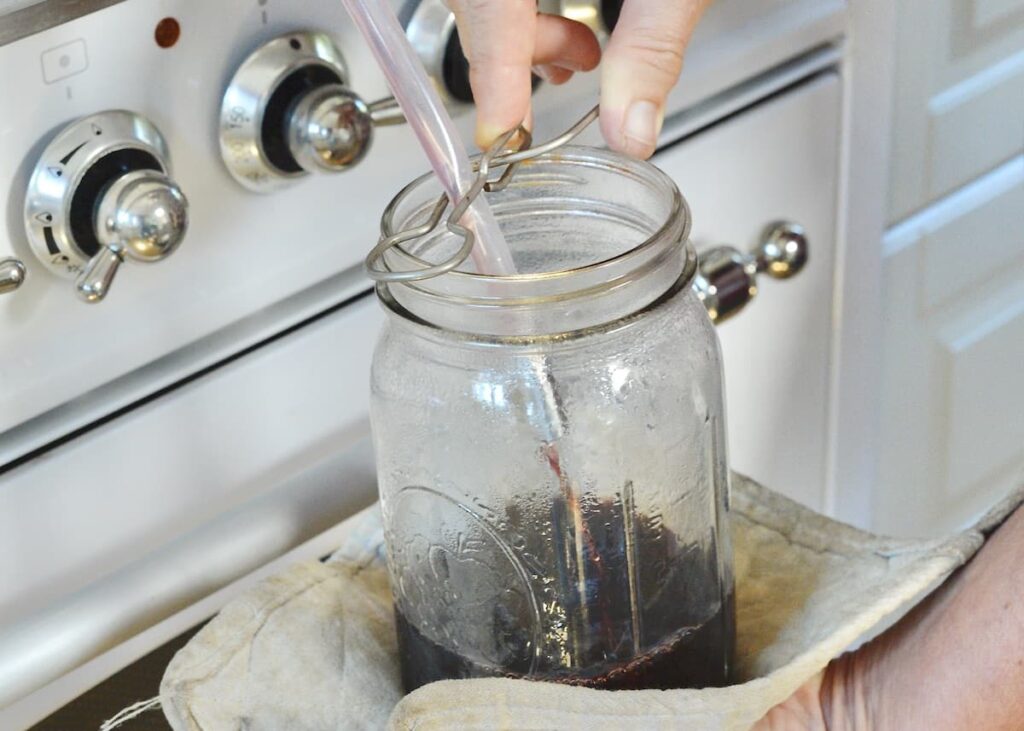
- Either periodically or all at once, fill the clean jars or glass bottles with the steaming hot juice and close the lid.
Method 2 – The Pot
- Add the elderberries to a pot or large saucepan. Add just enough water to cover them.
- Bring the pot to a boil, then turn the heat to simmer.
- Boil the berries for about ½ hour or until all of them have popped. You can then also use a potato masher to release all the juice.
- Using a fine mesh strainer, separate the liquid from the berries. You can either strain it directly into jars or bottles (using a funnel) or into another large bowl or pot. Either way, make sure that the juice it steaming hot. You may have to reheat it before you fill the canning jars. Tightly close the lid.
Method 2 – The Instant Pot
- I don’t own an instant pot but you can follow this recipe if you have one and would like to use it.
- Strain and can the juice as in the previous methods.
How to enjoy Elderberry Juice
Here are some ways to enjoy your elderberry juice:
- Drink it straight: While somewhat tart, you can absolutely enjoy elderberry juice with nothing else added. I love heating mine before drinking.
- Add some lemon juice: The longer you boil the elderberries, the less Vitamin C your juice will have. You can always add some lemon juice then and a sweetener of your choice.
- Add some sweetener: You can also add some raw honey, sugar, maple syrup, or grape juice (if you want to use less sugar) to taste.
- Make elderberry extract: You can also boil the juice down to make an extract. NOTE: Boiling the elderberry (juice) for a long time, will decrease the amount of Vitamin C but it will still contain its other immune-boosting compounds.
- Make your own elderberry syrup: You can simply remove the berries from the stems, and add some fresh ginger, a cinnamon stick, honey, and some water. Optional: add some star anise and whole cloves. Boil this mixture for 20-30 minutes. You can find the full recipe here.
I prefer to not add any sweetener to the juice but instead do that when we actually consume it.
You can sweeten then it with sugar or stevia (my preferred method). It’s also great with some apple juice, especially if you’re looking to balance out the tartness of the elderberries.
Elderberry juice has a gentle warming effect on the body. Therefore, we love drinking it piping hot in the cooler seasons. Or when someone feels like they have a cold or flu symptoms. You can also consume it regularly for general immune support.
Common Questions:
- Do I need to process the elderberry juice? While the FDA and USDA recommend processing jams and juices in a waterbath or pressure canner, I don’t usually do that and here are the reasons why.
- How do I select ripe elderberries for making juice? Elderberries should be plump and completely black. Some varieties have a white coating which is harmless.
- Are elderberries safe to eat raw, or do they need to be cooked for juice? Raw elderberries are mildly toxic and should be boiled for at least 10 minutes before consumption.
- Can I use frozen elderberries for juice, or do they need to be fresh? Yes, you can freeze elderberries before steaming or boiling them.
- What is the recommended ratio of elderberries to water or other liquids when making juice? You want to use as little water as possible to steam or boil the elderberries.
- How long should I cook elderberries to make juice, and at what temperature? Simmering is fine and typically you want to boil them for at least 10 minutes.
- Are there any potential risks or side effects associated with consuming elderberry juice?
- How should I store homemade elderberry juice, and what is its shelf life? Homemade elderberry juice should be good for at least 6 months at room temperature. However, I recommend keeping it in a dark, cool place. To extend its shelf life you can add some lemon juice, citric acid, or malic acid.
- Can elderberry juice be used as a natural remedy for colds or flu? Elderberries are traditionally used to help address cold and flu symptoms.
- Can elderberry juice be combined with other fruits or ingredients for added flavor? Yes, you can add grape juice, apple juice, pear juice, lemon juice, or any other fruit you like!
- How can I make sure I’m harvesting elderberries from a safe and non-toxic source? When picking wild elderberries you want to use common sense and avoid elder trees close to busy streets or potentially contaminated streams.
Other Elderberry Recipes You Might Enjoy:
Why and how to use Elderflowers
How do you like to enjoy Elderberries? I would love to hear from you in the comments below!
Homemade Elderberry Juice
Equipment
- steam juicer optional
Ingredients
- 5 pounds elderberries larger stems and leaves picked off
- 2 quarts water
Instructions
- Fill the bottom of the steam juicer with at least 10 cups of water. Place the top part back on the juicer and bring the water to a boil over high heat.
- Fill the top portion of the juicer with your elderberries. I recommend picking out any green berries. I typically throw the elderberry clusters in there with the little stems but cut off the bigger stems and leaves. NOTE: Raw elderberries as well as the leaves and stems are mildly toxic (they contain cyanogenic glycosides).
- Once the water is boiling turn it to simmer. The steam will extract the juice from the berries and will pool in the middle portion.
- Either periodically or all at once, fill the clean jars or glass bottles with the steaming hot juice and close the lid.
Notes
- you can drink this juice straight from the jar or add your favorite sweetener to taste
- you can also put the elderberries in a large pot, barely cover them with water, gently boil them for about 30 minutes, mash them with a potato masher, and put the juice through a fine mesh sieve
- this elderberry juice is perfect as it is or as a base for your elderberry syrup
How does this work with dried elderberries?
You would have to soak the elderberries first until plump and soft before continuing with the recipe ~ Anja
Hi! How much juice would you recommend taking daily as a preventative method, and how much when you are actively trying to get better from a sickness?
You can experiment with 2-3 cups when you’re sick and 1 cup as preventative. Remember that I cannot give medical or health related advice so it is best discussing this with your qualified health care professional ~ Anja
Our wild elderberry bushes were killed off by an invasive vine but we did get one large harvest that was turned into the most wonderful juice and a ‘failed’ batch of jelly that became an even more wonderful rich syrup that we used to flavor homemade Greek-style yogurt. We canned both in quart jars and are down to the last quart. I feel better when I consume elderberry-anything; it tames some autoimmune symptoms. My first-ever batch of sourdough bread is in the oven (made with your recipes for starter and loaf…oh for some of that jelly!). Thank you for your content; I was intimidated by the earlier research and the idea of being tied to the ‘modern’ standard methods. Throw out starter?! I used to make wicked-good butter when I had access to raw cream thanks to my Danish grandmother who taught my mother. I have their wooden bowl and paddle. Treasures.
I am so happy to hear you’re enjoying my content ~ Anja
I have a steamer that I use like yours for grape juice. So I’m very familiar with it. This will be the first year I use it for the elderberries. I saw that you put the juice in glass jars that were not. necessarily canning jars. How were they processed? Also I noticed nothing is added for juice only. I am assuming that when you use the juice that is when you can add sweetener or maybe even turn into syrup if wanted. I primarily am just having a supply of it for health reasons.
Good questions. Most Europeans reuse regular bottles and jars for canning so that is what I do. Also, I do boil the juice right before consuming just to be safe however I have some more information here: https://ourgabledhome.com/botulism-and-how-to-can-at-home-without-fear/ and here: https://ourgabledhome.com/how-i-have-been-successfully-canning-without-the-waterbath-method/ Hope that helps ~ Anja
Just watched your video and noticed that you didn’t put any lemon juice in your canned juice. I have canned up several jars and didn’t either but have seen other recipes are saying it is important to add. Have you had any problems with not adding acid to the elderberry? I have chokecherry and grapes that I have done too without the acidity added.
Hi Phyllis, as far as I am concerned I would add lemon juice for two reasons: either to make the jam taste better or to lower the pH. Most fruits have a pH low enough so you do not have to add anything acidic. Sometimes I do and sometimes I don’t. Hope this helps ~ Anja
I agree with you! To use this steam juicer, just add water to the bottom pan. Do not overfill the container. However, if you want to steam for an extended length of time, be sure to check the water level. Glass marbles have been reported to be used as a bottom pan filler. While water is heating, marbles create a noise that gradually fades away as the water evaporates completely. This is something I’ve never done before and it’s gone well.
Yes! Either check up on the water level every so often or use the marbles. Thank you so much for commenting ~ Anja
Hi there! I’ve been making Elderberry syrup for a few years now and learnt this year steam juicing is the best way to extract all the goodness from it!
My question is, what is the shelf life of the juice once bottled?
Hi Angela, if you use safe canning practices, it should last a few years. I personally have enjoyed some that were 5 years old. Hope this helps 😊
I have never seen one of these juicers. Do you use it for things other than elderberry juice?
Yes, you can juice all sorts of fruits with this steam juicer either to make juice or jellies.
I’ve always used dried elderberries purchased from the store. But you have convinced me that I need to plant my own. Thank you for this post — I never even thought of juicing the fresh berries (hence the reason to get my own plants)!
Thanks for the comment – and I am so glad to have inspired you 💜!
I planted two elderberry bushes a few years ago. Unfortunately I think an over-zealous yard mower took them down by accident. You have inspired me to plant some more. I like that you don’t add sweetener. I have always wondered about the recipes for elderberry syrups for cough that are laden with sugar. I can’t imagine that would be very beneficial!
Yeah! That’s awesome that you had planted elderberries before! Plant them again, they grow easily and you’ll love the fruits 😊
Very interesting. I’m not sure that I’ve ever seen elderberries before. I need to look and see if they grow in my region. Great post!
Thank you for your comment! I wish I could help you find elderberries in your area 😉